Configure the SCORM .zip file
When a training module uses content in the SCORM format, it is important to configure the .zip file correctly to ensure that the student views the content without problems. The main file, which presents the content to the student, must be named index.
Instructions
Step 1: extract the files from the .zip folder
If the folder is already unzipped, proceed to step 2.
Locate the SCORM .zip folder on your computer
Right-click on the file
Click Extract All...
Click the Extract button
A new folder will be created with all the files.
The steps described were carried out in Windows 11.
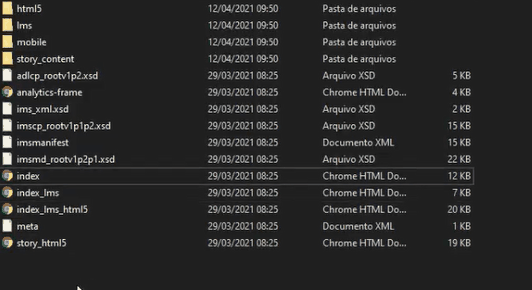
Step 2: rename the main file
Inside the new folder, locate the main file with the contents
If you're not sure, open the files to identify the correct one.
Right-click on the main file
Click on Rename
Change the file name to index (with all lower case letters)
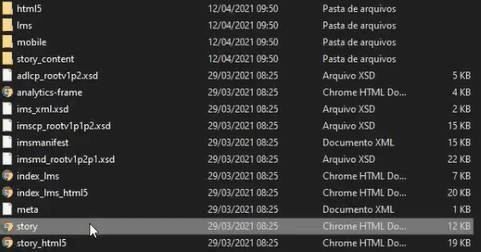
Rename the main file to index
The steps described were carried out in Windows 11.
Step 3: compress the files in a new .zip folder
Inside the SCORM folder, right-click and select New > Folder
Name the new folder res (with all lower case letters)
Move all the files from the SCORM folder into the res folder
Create and move the files into the res folder
Right-click on the res folder
Click on Compress to ZIP file
If you wish, rename the generated .zip file
The steps described were carried out in Windows 11.
Step 4: add the .zip file to the platform
If you are creating the module:
In the registration Type field, select Scorm
Fill in the other fields of the module as desired
Click the Save button
A page will open to upload the file.
Drag the .zip file created in step 3 to the upload area specified on the platform
A green tick will confirm that the upload was successful.
If the module has already been created:
In the list of training modules, locate the module where you want to add SCORM
Click on the Select option
Click on the SCORM option in the list
Drag the .zip file created in step 3 to the upload area specified on the platform
A green tick will confirm that the upload was successful.
Step 5: check that the SCORM file is working
In the list of training modules, locate the module containing the SCORM file added in step 4
Click on the Select option
Click on the To Change option in the list
In the SCORM field, click on the file to open it
If the content opens correctly in a new tab, the configuration is correct.
If a “Not Found” error page appears, review the previous steps to ensure that SCORM has been configured correctly.